IGListCollectionViewLayout
IGListCollectionViewLayout 其实不太算得上是 IGListKIt 的内容,它主要作用是提供一个可变宽度和高度的流式布局。看下来发现这块写得太好了,从里面可以学到很多如何高效编写一个自定义的 UICollectionViewLayout 的相关技巧。
IGListCollectionViewLayout 提供了一些常用的 static 的方法,用于在计算布局时根据滑动方向获取不同的属性,其中一个例子如下:
1
2
3
4
5
6
static CGFloat UIEdgeInsetsLeadingInsetInDirection(UIEdgeInsets insets, UICollectionViewScrollDirection direction) {
    switch (direction) {
        case UICollectionViewScrollDirectionVertical: return insets.top;
        case UICollectionViewScrollDirectionHorizontal: return insets.left;
    }
}
设置 UICollectionViewLayoutAttributes 的 zIndex ,这样使得 FooterView 可以在 sticky 时不被 Cell 覆盖:
1
2
3
4
5
6
7
8
9
10
11
12
13
14
15
16
static void adjustZIndexForAttributes(UICollectionViewLayoutAttributes *attributes) {
    const NSInteger maxZIndexPerSection = 1000;
    const NSInteger baseZIndex = attributes.indexPath.section * maxZIndexPerSection;

    switch (attributes.representedElementCategory) {
        case UICollectionElementCategoryCell:
            attributes.zIndex = baseZIndex + attributes.indexPath.item;
            break;
        case UICollectionElementCategorySupplementaryView:
            attributes.zIndex = baseZIndex + maxZIndexPerSection - 1;
            break;
        case UICollectionElementCategoryDecorationView:
            attributes.zIndex = baseZIndex - 1;
            break;
    }
}
这里取了个巧,假设每个 Section 的 Item 数量不超过 1000 个,每个 Section 的起始 zIndex 为 baseZIndex ,值为 attributes.indexPath.section * maxZIndexPerSection ,然后根据 attributes.representedElementCategory 进行判断:
UICollectionElementCategoryCell,baseZIndex + attributes.indexPath.item,根据indexPath.item进行叠加;UICollectionElementCategorySupplementaryView,位于每个Section的顶部,所以zIndex为baseZIndex + maxZIndexPerSection - 1;UICollectionElementCategoryDecorationView用于设置背景,所以应该位于最底部;
一般来说 iOS 应该很少出现单个 Section 超过 1000 ,如果出现了而又设置 stickyHeaders 为 true ,那么就可能会出现 Cell 把 HeaderView 覆盖的情况。
如何实现 stickyHeaders 功能。 IGListKit 自定义了一个 UICollectionViewLayoutInvalidationContext 的子类 IGListCollectionViewLayoutInvalidationContext ,用于在布局信息失效时提供相关变量:
1
2
3
4
@interface IGListCollectionViewLayoutInvalidationContext : UICollectionViewLayoutInvalidationContext
@property (nonatomic, assign) BOOL ig_invalidateSupplementaryAttributes;
@property (nonatomic, assign) BOOL ig_invalidateAllAttributes;
@end
ig_invalidateSupplementaryAttributes 表示 Header 和 Footer 相关布局信息都失效,需要重新计算; ig_invalidateAllAttributes 表示所有布局信息都失效,都需要重新计算;
如果需要自定义 UICollectionViewLayoutInvalidationContext ,需要重写下面的方法,返回对应的子类:
1
2
3
+ (Class)invalidationContextClass {
    return [IGListCollectionViewLayoutInvalidationContext class];
}
当 UICollectionView 的 bounds 将要发生变化时,会调用 shouldInvalidateLayoutForBoundsChange: 方法,如果返回 YES 则会调用 invalidationContextForBoundsChange: 获取新的 IGListCollectionViewLayoutInvalidationContext 。
1
2
3
4
5
6
7
8
9
10
11
12
13
14
15
- (BOOL)shouldInvalidateLayoutForBoundsChange:(CGRect)newBounds {
    const CGRect oldBounds = self.collectionView.bounds;

    // 如果 size 改变了,
    if (!CGSizeEqualToSize(oldBounds.size, newBounds.size)) {
        return YES;
    }

    // 2.
    if (CGRectGetMinInDirection(newBounds, self.scrollDirection) != CGRectGetMinInDirection(oldBounds, self.scrollDirection)) {
        return self.stickyHeaders;
    }

    return NO;
}
- 如果
size改变了, 布局肯定是会失效的,所以这里直接返回YES; - 如果滑动方向上的坐标改变了,则返回
stickyHeaders的值,因为当stickyHeaders为YES时,我们需要重新计算Header的布局;
1
2
3
4
5
6
7
8
9
10
11
- (UICollectionViewLayoutInvalidationContext *)invalidationContextForBoundsChange:(CGRect)newBounds {
    const CGRect oldBounds = self.collectionView.bounds;

    IGListCollectionViewLayoutInvalidationContext *context =
    (IGListCollectionViewLayoutInvalidationContext *)[super invalidationContextForBoundsChange:newBounds];
    context.ig_invalidateSupplementaryAttributes = YES;
    if (!CGSizeEqualToSize(oldBounds.size, newBounds.size)) {
        context.ig_invalidateAllAttributes = YES;
    }
    return context;
}
整体流程如下: 1. 创建一个自定义的 IGListCollectionViewLayoutInvalidationContext ,通过 ig_invalidateSupplementaryAttributes 来标记 supplementary attributes 失效; 2. 在 -shouldInvalidateLayoutForBoundsChange: 中返回 YES ; 3. 在 -invalidationContextForBoundsChange: 标记 IGListCollectionViewLayoutInvalidationContext 的 ig_invalidateSupplementaryAttributes 为 YES ; 4. 在 -invalidateLayoutWithContext: 方法中,如果 context 的 ig_invalidateSupplementaryAttributes 为 YES ,则清除 supplementaryAttributesCache ; 5. -layoutAttributesForSupplementaryViewOfKind:atIndexPath: 获取布局信息时,先检查 supplementaryAttributesCache 是否有对应的布局信息,如果没有,则重新生成; 6. 确保 -layoutAttributesForElementsInRect: 通过 -layoutAttributesForSupplementaryViewOfKind:atIndexPath: 获取布局信息。
其它
https://twitter.com/_ryannystrom/status/1344322269099810822 这条推总结了 IGListKit 的开发历程。作者在 Instagram 时,产品的迭代在假期中会变慢,所以他们决定用这段时间来偿还技术债务。在 2014 年的冬季,为了从 UITableView 迁移至 UICollectionView ,作者 review 了超过 12K 行的代码。同时也去掉了对 iOS5 的支持,使得可以直接使用 iOS6 新增的 API 。通过这次重构,作者也总结了以下经验:
- 数据源应该统一在一处修改,否则会产生数据不一致的异常;
UIView的第一次布局可能会自动调用reloadData;- 如果
header view需要设置为sticky,即滚动时始终停留在顶部,那么就需要在滚动时进行frame的计算,会有性能损耗。
Instagram 之前直接使用 reloadData ,大部分情况下表现都没问题,但是以下两件事情一直困扰作者:
- 不支持动画;
- 图片会闪烁,而且进行中的动画也会取消。
这些都是因为 reloadData 的机制造成的,在 reloadData 时,所有显示在屏幕上的 Cell 都会进行复用。因此即使 UI 不变, Cell 仍然需要进行复用(或者初始化),重新绑定数据,设置图像等,这涉及到大量的计算和操作。 以 Instagram 的点赞操作为例,当点赞某条 post 时,会调用 reloadData 。因为所有 Cell 都进行了复用,所以需要记录点赞的 Cell 所在的 row ,然后进行 reload ,再执行类型的动画。如果动画开始后某些操作又触发了 reloadData ,那么动画就会被取消,也就导致了 UI 错误。 图片闪烁的问题就比较简单,当包含图片的 Cell 被复用时,会将背景设置为灰色,然后从缓存或者网络中异步获取图片,进行设置。复用和从缓存中获取/设置图片之间的异步时间差是造成闪烁的原因。 作者开始思考为什么不仅仅更新有数据修改的 Cell 呢?其他框架也有类似的解决方案,不如 React :将数据绑定到 View ,当数据更改时只是将修改的数据重新绑定到 View ,同时触发 View 的修改。 按照只在一个地方更新数据源的原则,需要计算新旧数据的不同,使用 UICollectionView 的 API 来进行传入/删除/重新加载/移动,不接触其它没有改动的地方。作者研究了好几种 diff 算法: rsync , Myers ,React ,最后选择了 Paul Heckel 的算法 https://dl.acm.org/doi/10.1145/359460.359467 ,原因如下:
- 计算结果与
UICollectionView的 API 匹配:插入,删除,更新和移动; - 能够理解部分的实例实现。
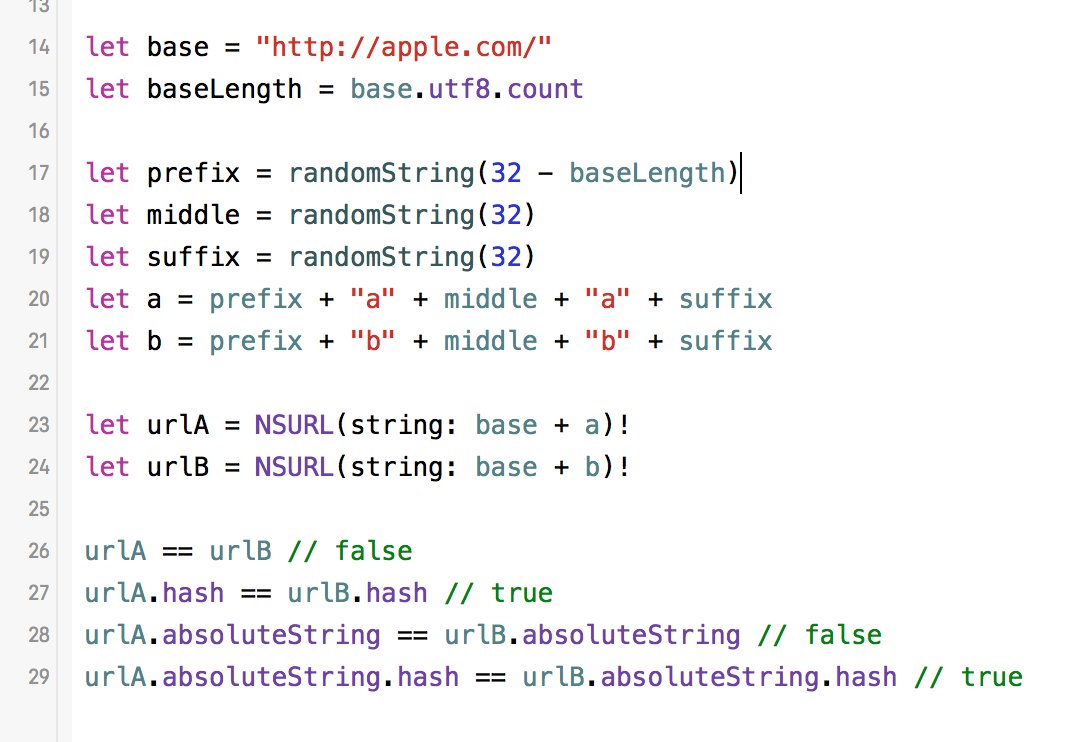
另一个关键的决定是如何定义 identity 和 equality 。作者本来是想直接使用 NSObject 的 -hash 和 -isEqual: ,以免工程师需要编写/理解差异概念。但是 ryanolsonk 认为作者是错误的,因为 -hash 是非常复杂的算法: mikeash.com: Friday Q&A 2010-06-18: Implementing Equality and Hashing Foundation 的 hash 有可能会产生冲突,比如 NSString ,只使用前缀/中间/后缀部分的 32 个字符来进行 hash 的计算:
https://twitter.com/jaredsinclair/status/746013622095208450?lang=en

objective c - Hash value of NSDictionary - Stack Overflow
NSDictionary 的 hash 计算也有问题,下面两个 NSDictionary 的 hash 值是相等的:
1
2
3
4
5
6
NSDictionary *dictA = @{ @"foo" : @YES };
NSDictionary *dictB = @{ @"foo" : @NO };

BOOL equal = [dictA hash] == [dictB hash];

NSAssert(!equal, @"Assuming, that different dictionaries have different hash values.");
根据 CoreFoundation 开源版本的代码:
1
2
3
4
5
6
7
8
 static CFHashCode __CFDictionaryHash(CFTypeRef cf) {
    return __CFBasicHashHash((CFBasicHashRef)cf);
}

__private_extern__ CFHashCode __CFBasicHashHash(CFTypeRef cf) {
    CFBasicHashRef ht = (CFBasicHashRef)cf;
    return CFBasicHashGetCount(ht);
}
只是简单地使用了 NSDictionary 中存储的 key-value 数量来作为 hash 值,换句话说 dictA 和 dictB 的 hash 值都是 1 。 如果想要一个更加可靠的 hash 值,那么需要自己在 Category 中提供自定义的方法。
作者最后选择了 protocol 来提供 identifier 和 -isEqual: ,不使用 NSObject tricks 的解决方案,因为有可能被滥用和遗漏,从而导致崩溃。 后来 jesse_squires 和作者一起重构了大约 20k 行的代码,使得可以在旧的基础上运行 IGListKit ,以此来安全地进行 AB 测试。首先是从单项的 Feed 信息流开始,然后很快就开始支持首页的信息流,而首页信息流非常复杂(这个时候开始支持在信息流中插入广告)。如果说可以替换掉信息流的实现,那么 App 的其它部分也可替换了。 ocrickard 和作者一起画了几个月的时间来研究崩溃和提升性能。这段时间内,作者学到了很多 Objective-C ++ 的知识,比如说 unordered_map 比 NSDictionary 快很多。 同时也发现了 UICollectionView 的一些 bug :Issues · Instagram/IGListKit · GitHub 当所有这些准备工作都完成后,开始在 App 内大范围使用。作者花了一年时间来协助工程师重构和弃用旧的实现。个人资料页的重构比较困难,作者只能自己来完成这部分的工作。当个人资料页完成后,多达 12k 行的改动。 作者提到一开始他们就希望开源 IGListKit ,因此带来了大量的书面工作和内部一些政治事务。 整个开发周期从 2015 年末开始,2015 年开始编写,2016 年夏季在 Feed 信息流中应用, 2017 年初替换了旧的实现。在整个过程中 Instagram 也在逐步成长,工程师团队扩大了 10 倍,用户量则是 4 倍, Instagram 开设了纽约办公室等, UICollectionView 也支持了 diffable 的数据源。
可以看到由于 Instagram 项目非常庞大的关系,整个过程持续了一年半,从算法选型,实现,ABTest 到完全替换。虽然 IGListKit 是一个使用 Objective-C 编写的库,但是对 Swift 的支持非常友好,可以无痕支持 Swift 项目。作者后来去了 Github ,原推的评论区也有提到 Github iOS App 使用 IGListKit 的 Swift 版本,或许在不久的将来可以开源。顺带一提前几天大火的 ClubHouse 也有使用 IGListKit 。
这里有个 UITableView 版本的 IGListKit :UITableView 组件化 · 阿毛的蛋疼地 。
Comments powered by Disqus.